Showing posts with label Tutorial. Show all posts

Tuesday, December 13, 2011

How to: Edible paint

Oh hey! Another tutorial, didn't see this one coming! 

Yesterday I was simply browsing (Quite aimlessly I must say, in search for something interesting and surprisingly found that "something interesting"!) through one of the homeschooling group on FaceBook that I had joined and there was just this one post that caught my eye "Homemade cornstarch paint" it said.

(This was where the link directed to: Homemade cornstarch paint. I officially absolutely love this blog!)

So yeah, I kinda tried making my own paint today!
Usually I never start on these kinda projects, kinda like the time when I wanted to try out Alan Dunn's Cold porcelain but never actually did it for some unknown reason.. But the instructions were SO simple and the list of ingredients was SO short that I simply had to!
And since the ingredients were only water and cornstarch that would make it edible, right? (Can't wait to try my edible paint on a cake!)

If you haven't viewed her blog yet this is basically what you need to make your own paint-

1 Cup of water
1 Tablespoon of Corn starch

A tiny saucepan/pot to cook your paint in, hmm.. That sounds somewhat funny!
Food coloring


1st stop (Step, stop.. Same thing right? Just a different alphabet in the middle and a completely different meaning! .. But at least it rhymes!):

Fill ye cuppa with H2O (I guess you could use boiled, then cooled water if you are going to paint on a cake or just plain tap water if you aren't going to eat it!) to thy brim.

Pour ye liquid into ye miniature pot.


2nd Stomp:

Plonk in a tablespoon of  corn starch and mix all the lumps out or you are going to be in BIIIIGGG trouble.

I had to make this twice because I actually FAILED on my first try!
I didn't mix the corn flour in and once it boiled my "paint" had little jelly like lumps in them!  


3rd Storm:

Plop the pot onto the stove, put thy fire on medium and stir like no tomorrow so the corn flour, starch err... Same thing! Doesn't settle and form the very un-wonderful lumps!

Stir, stir, your neighbor may think your mad but CONTINUE, stir, stir, your neighbor may officially think you're possessed but CONTINUE, stir, stir!

Hmm, don't you think that would make one wonderful song? 


4th Store:

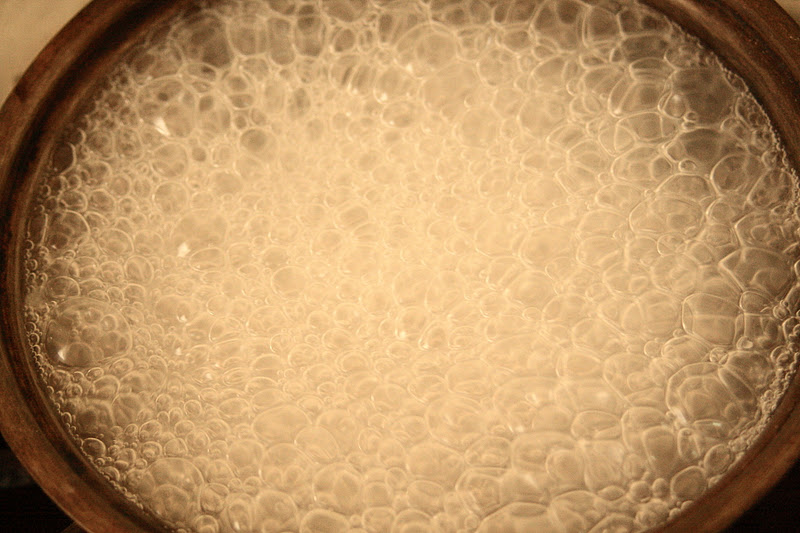
If your neighbor hasn't taken you to the nut house, you may continue stirring till some scary bubbles start forming!

The scary bubbles is a sign that the paint shows when it's well, PAINT.


5th Star:

Put the fire off and the scary bubbles will go away, if you don't they would probably over flow and you would have to mop up the whole kitchen and trust me, the "paint" is quite sticky and icky.

You should end up with a thicker liquid from what you started with.

Congratulations, you have made P-A-I-N-T!


Now, whip up, I mean OUT some food coloring!
I just kinda realized I don't own "liquid food coloring"!

So if you don't own liquid food coloring you may want to whip out some tooth picks as well to kinda transfer the gel food coloring from the container to the paint.


And.. I kinda just realized I don't own a paint pallete so I used my gem chocolate/candy melts/gum paste/royal icing instead!  


And.. I don't own proper "paint brushes", all of mine are kinda.. Used for dusting gum paste flowers!
Oh gosh, this is hilarious..

So sob, sob, I had to sacrifice a couple of paint brushes for my edible paint "test drive"!


The results from my five minute test drive!

Err... Not exactly my favorite "paint", I would 100% still buy my favorite acrylic paint for art projects and as for cakes.. I guess I am stuck with my SK edible paint or food coloring!
It was a bit too.. Transparent and jelly like, I would rather paint with food coloring, somehow but I guess if you aren't painting details it's completely fine! 
In other words.. Just make a whole tub full for little kids to splatter about! 


Had LOADS, about say.. 1/2 Cup or so of leftover paint!
Chucked it into the fridge, I wonder how long it would last? Will keep you updated!

-Karen Kookingpaint Kake

Monday, August 22, 2011

How to: DIY Gumpaste rose veiner

Omsk to you and you and you! Didn't expect to be back so soon but I guess you followers must be praying hard, eh?

ANYWAYS (I hereby swear that I will use this word in every post I post this blog of mine.), I was in my caking room one fine afternoon after lunch wanting to start on some gum paste roses since my hands were rather tired from all that RI piping, even though I hadn't started piping yet that day I already was, mentally, I suppose.
Not long after gathering most of my tools I realized my "paint brush veiner" (It was an old wooden paintbrush which I turned into a veiner by using my craft knife to kinda cut very slightly all around the paintbrush handle vertically.) was missing so... I decided to make another and also decided to make it into a short tutorial since I haven't made one in some time and I missed making one (You get hooked onto it, somehow.)!

Saw some florist wires laying around on my table I cut out the day before to make the wired petals and then the idea just hit me. BLONK*

Stuff you need:

30 Gauge wire (Actually it doesn't really matter it's up to you how "big" you want the veins to be but 30 gauge seems to be the best.)
Any type of tape
A wire cutter and scissors to cut the wire and tape.

I am pretty sure every cake decorator has these right? Proves how easy (And inexpensive compared to store  bought ones!) it is to make a rose veiner!


 Step 1:
Take about 4 "strands" of wire.

Step 2;
Chop each wire into three, you should end up with this white wire-y mess.


Step 3:
Cut some tape and wrap it around the middle, make sure all the wires are at different lengths and........... You are DONE! I hope you didn't expect it to be extremely long! 

Mmm... This post seems a little too short to end so lets test the veiner, eh?


1. Lalala... Roll out some gum paste to the usual transparent-ish, chomp out some petals with a cutter.

2. Deep breath* Place your veiner on the petal, use your index finger to roll it with a tinge of pressure from one corner to the other.


3. Roll your ball tool all round the edges of the petal (My thin foam pad kinda disintegrated and not long after I realized my palm was better than the foam pad! I also like the fact that the back of my petal doesn't get that "spongy texture" which I have always hated seeing in my roses from day one! One of the reasons why I like making freehand roses better!) and WALAH! I hope you can see the veins properly, I am a lousy photographer, I think I have mentioned that before. 

4. Add a few more rounds of petals (Continue making your rose here, you may want to skip the petal making part though.) and TADAH! (Excuse mess.)


Eeee... Feeling so slippery sleepy now and I have riding tomorrow, good night me lovelay followers! Huge sleepy smile*

-Karen Cuppy Cake

Monday, July 4, 2011

How to: Extremely FUN Spinach Noodles

Spinach noodles.. I can see the face you have on right now! Who ever eats GREEN noodles? Well, I do and they are surprisingly yummy after you get pass the fact that they are green and spinach is one of my favoritest vegetables so I like the light spinachy taste they have.

Oh and you are probably wondering about the "Extremely Fun" part in this post's title... Well we are getting to the fun part!

Just for your information, it doesn't have to be spinach. It can be basically any vegetable that can be pureed (Carrot sounds nice and it won't seem too gross...) actually, so I guess it will be fun experimenting, huh? Oh! And it's "Health freak" and kid (My three brothers helped me and my Mom out today, should I count myself in the "kid" part?) friendly! Smiley face*

First tried them out in a restaurant at Jaya One quite some time back and found them REALLY nice so we decided to go hunting for a recipe and trying it out, it's our first time making this at home and... I just bought a new PASTA MACHINE (It's actually for rolling out gum paste but well... i guess I am just testing my new toy/machine out today!)!

Okay! Let's get started with our super simple spinach noodles!

You will need:

2 1/2 Cups of Spinach leaves without the main stem but the tiny ones attached to the leaves are fine, compact the leaves into the cup, please.
4 Tablespoons of water
1 Teaspoon of Salt
2 1/2 Cups of All purpose flour
Pasta machine or rolling pin.

Yep! No fancy ingredients (Unless you count spinach fancy in which ever strange country you are from.)! Nice, huh?

Oh right, and before you start on the noodle making.. You might need to make the really simple but yummy Mommy's soup.

Ingredients:

A pot filled with water
A few chunks of whatever fish
A few chucks of ginger
Some salt
Freshly ground pepper

Mommy's method:

Chuck everything into the pot and boil.

Okay! There you go! Your soup!

This recipe fed:

1 Obaachan
1 Okasan
1 Otosan
1 Musume
3 Pesky little brothers, I have no idea how to say that in Japanese, yet.

Step 1:


Rip your leaves up a bit, make sure you use your baby brother to do this (Don't have one? Feel free to borrow mine.), it will make things much easier and you won't have to get your hands leafy, unless you enjoy it that is, then go ahead.


Combine the leaves and that four tablespoons of water you have into a sauce pan.
Put it on a medium-slow fire, cook till tender. It would be good if you could put the lid on so it would speed this process up.


Turn off the fire and cool once it is done.

Step 2:


Place your eggs (Oops! One of the yolks got cut by the sliiiccceerrrr! Say with weird evil voice*), salt and spinach into a blender or food processor.


Blend on low speed till it looks as disgusting as this. 


Step 3:

In a mixing bowl, poof your flour into it, make sure you drop it from the ceiling to make an AWESOME cloud of flour. Which will choke you and make you die but.. it was fun right?


Step 4:


Pour the spinach mush into your pristine white floury mixing bowl and... Stick your hand (Putcha right hand in, putcha right hand out! Putcha right hand in and please don't shake it all about! Do the hokey pokey and please do turn your self around.. THAT'S what it's all about!) in and KNEAD! 


Till it looks like this (Add more flour if it's too mushy but I don't think it would be.) then plonk it out onto a lightly dusted table and knead it for about 10 minutes or so..


Step 5:


Get a quarter or so of the dough blob and try flattening it as much as possible and flouring it heavily (You don't want it to end up sticking onto the pasta machine when you roll, do you?) on both sides before rolling it out in the pasta machine.  


Flour the table quite a bit too, to prevent it from sticking or you will have a hard time!
Let the rolled out dough rest for 20 minutes before "Shredding" (Make sure you dust them with yet another layer of flour, it somehow cuts better so you don't get sticky together noodles, I am pretty sure you won't want to eat those..) them into noodles. 


Step 6:


Once you have "Noodle-y-fied" the dough it's time... 
For the "Extremely fun" part! Yippeeee!
(I was supposed to drape them on a rack but it was rather sticky so I did this instead and it worked, WOO HOO!)


Now, to prevent it from clumping together, dust your table yet again then call all your little brothers over then start tossing them into the air! Do this to your heart's content, don't worry the noodles won't protest.
You should end up with noodles all over your table and flour and tiny strands of noodles on the floor. Another smiley* 
I assume this process makes the noodles springy? 


Let noodles rest for another TWO hours before cooking.


Step 7:


Re-heat your soup if it is cold, put some water into a wok and wait for it to boil before putting your noodles in for half a minute, take it out and rinse under cold water, then plop it into your bowl.


Pour the soup in and garnish with anchovies (Make sure you deep fry them first, ya?) and some weird edible leaves (Boil them a bit first.).


YUMMY! Had one of the best lunches EVER! Huge grin*


~K

Wednesday, May 4, 2011

How to: Air dried clay/Gum paste wood look

After many busy caking days and days out of the house I finally had an "At home" day.
I started on this "secret" (At the moment it is.) clay project last night, I have been wanting to do it since I got very VERY obsessed with it/her/him (Circle the one you think is correct!) and I finally had the time to, yippee!

Made a few parts of the body last night, decided to make the " wooden stand" as a tutorial today.

One of my goals this year was to improve my figurine modelling skills which I am still COMPLETELY utter rubbish at! (It just does not come as easily as piping or flower making.) 
So this clay project is one of my "practice" sessions I have when I am free/bored.

Oh right, back to the "How to" which I haven't even started with yet!

You will need:

Air dried/drying (I can't seem to remember the name very well, but it ISN'T polymer clay.) or Gum paste
PVA glue/Edible glue AKA water or water+tylose
A peanut butter/Nutella jar cover or just any round surface which includes the top of your cake!
Some ribbon
A paint brush
A wooden skewer
Light brown, dark brown and black oil paint or gel food coloring 
A knife, the blunter the better for this project! 

Skip to "Step 2" if you wish to do it without the base/cover.  


Step 1:
Spread a thin layer of glue on the cover with the back of your wooden skewer.
Roll out some clay/gum paste, use the bottom of the cover to cut the shape out.


Step 2:
Draw some "Deep" horizontal lines (Or vertical, it's up to you!) with your knife.
Not so deep if you are making the wood off the cover.
(Excuse the ribbon for the next few photos, it isn't supposed to be there till the end.)


Step 3:
Draw some "light" random vertical lines. 


Step 4:
Use the tip of your wooden skewer to poke "nails" on both sides of every vertical line.


Step 5:
Use your knife to lightly cut the "wood grains" on the clay/gum paste.
The "Dark" lines (The first lines you drew.) may go out of shape at this point so you might want to re-do them.
Leave to dry over night, actually 3-4 hours are fine as long as the clay/gum paste hardens a bit. 


Step 6:
Start by painting a light brown base coat, make sure the white clay/gum paste doesn't peek out.
Add a few streaks of dark brown on the "plank" it self and the lines.
Dip the tip of your wooden skewer in black and re-poke the "nails".
Oh and add your ribbon on now! If you did before and if you were a messy person (Like ME!) you would have gotten brown/black paint all over them!

TA-DAH!!

You should probably end up with a pretty realistic looking piece of wood. Smiley face*

~K

P.S Hope you enjoyed (And benefited from)  my latest ultra short tutorial! Feel free to comment on how it was!

Tuesday, March 15, 2011

How to: Origami Crane

Sorry about me being MIA in my blog! 
I (I mean we, the Leong family.) have been hosting a Japanese youth exchange student, Machika since last Thursday and everyday has been REALLY exciting and drop dead tiring (Lets see... We went to Batu caves, Orang Asli museum, Genting Highlands, Broga Hill, Shopping @ KLCC, Port Dickson, Ice Skating, More shopping @ Sunway Pyramid. Super fun week!)! 
So glad I finally have the time to blog again today!

So anyways, Machika thought me and my brothers some origami when we were feeling a bit bored after coming back from one of our shopping trips.
I was rather hooked to the crane (I remember making it when I was schooling in Singapore but I have long forgotten how to make it!) and found it VERY addictive! (I have about 20 cranes on my caking table now! Ha ha ha!)

Okay let's start!


All you need is a piece of square origami paper.
Machika bought this REALLY pretty pack of 3 origami colored paper for me all the way from Tokyo!
(I hate the green but it's the only color that is visible on my table cloth!)
And...
Both your hands of course, I have yet to learn how to do it with my feet.


Step 1:
Fold the paper into a triangle. 


Repeat "Step 1".


Step 2:
Lift up one part the triangle with your finger.


And fold it down into a square.
Turn it around and do the same.


It should look like this once it is done.


Step 3:
Fold the sides of the square towards the middle.
The should be a faint line in the middle of the square so it should be easy to estimate.
Turn it around and do the same.


Step 4:
Fold down that little triangle on the top, turn it around and do the same to the other side. 


Open it up!


Step 5:
Oh dear, a tough to explain part..
Open one side of the square till the folded triangle on top part.
Fold the sides into the middle.
Turn it around and do the same.
It should look like a diamond now.


Step 6:
You should be able to see that one half of the diamond has a split through it

You are going to fold the sides in again.
The pointy part of the folded triangle should be at the split.
Turn it around and do the same. 


Step 7:
Now... Flip it to the 'clean' unfolded side.
(If you open up your "Step 6" origami piece slightly you should see that there are 4 sides so just flip it to the other 2 sides.) 


Step 8:
Fold the bottom up to meet the slightly split top.


It should look like a rather squashed tulip once you are done with "Step 8"!
Now...
Pull the 2 tulip petals that had the split before.
Yay! It's starting to look bird-y!


Step 10:
The other 2 rather long triangles are the head and tail.
Choose the longer one (If one is longer than the other, never mind if they are both the same length!)
for the head and bend it down slightly then squash it the other way.


TAH-DAAAAAH!


~K

P.S
Hope you enjoyed my first Arts N Craft (Just for fun!) tutorial!
Comments are more than welcome as usual.

Pages