After many busy caking days and days out of the house I finally had an "At home" day.
I started on this "secret" (At the moment it is.) clay project last night, I have been wanting to do it since I got very VERY obsessed with it/her/him (Circle the one you think is correct!) and I finally had the time to, yippee!
Made a few parts of the body last night, decided to make the " wooden stand" as a tutorial today.
One of my goals this year was to improve my figurine modelling skills which I am still COMPLETELY utter rubbish at! (It just does not come as easily as piping or flower making.)
So this clay project is one of my "practice" sessions I have when I am free/bored.
Oh right, back to the "How to" which I haven't even started with yet!
You will need:
Air dried/drying (I can't seem to remember the name very well, but it ISN'T polymer clay.) or Gum paste
PVA glue/Edible glue AKA water or water+tylose
A peanut butter/Nutella jar cover or just any round surface which includes the top of your cake!
Some ribbon
A paint brush
A wooden skewer
Light brown, dark brown and black oil paint or gel food coloring
A knife, the blunter the better for this project!
Skip to "Step 2" if you wish to do it without the base/cover.
Step 1:
Spread a thin layer of glue on the cover with the back of your wooden skewer.
Roll out some clay/gum paste, use the bottom of the cover to cut the shape out.
Step 2:
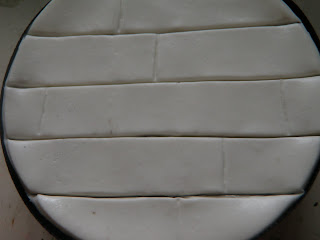
Draw some "Deep" horizontal lines (Or vertical, it's up to you!) with your knife.
Not so deep if you are making the wood off the cover.
(Excuse the ribbon for the next few photos, it isn't supposed to be there till the end.)
Step 3:
Draw some "light" random vertical lines.
Step 4:
Use the tip of your wooden skewer to poke "nails" on both sides of every vertical line.
Step 5:
Use your knife to lightly cut the "wood grains" on the clay/gum paste.
The "Dark" lines (The first lines you drew.) may go out of shape at this point so you might want to re-do them.
Leave to dry over night, actually 3-4 hours are fine as long as the clay/gum paste hardens a bit.
Step 6:
Start by painting a light brown base coat, make sure the white clay/gum paste doesn't peek out.
Add a few streaks of dark brown on the "plank" it self and the lines.
Dip the tip of your wooden skewer in black and re-poke the "nails".
Oh and add your ribbon on now! If you did before and if you were a messy person (Like ME!) you would have gotten brown/black paint all over them!
Oh and add your ribbon on now! If you did before and if you were a messy person (Like ME!) you would have gotten brown/black paint all over them!
TA-DAH!!
You should probably end up with a pretty realistic looking piece of wood. Smiley face*
~K
P.S Hope you enjoyed (And benefited from) my latest ultra short tutorial! Feel free to comment on how it was!


GREAT TUTORIAL!!! Wish I could make something like that but you know how horrible I am at gumpaste and clay! Love how realistic the planks of wood look.....:)
ReplyDelete